
Fungible Tokens
In this tutorial, we're going to deploy, store, and transfer fungible tokens.
https://play.onflow.org/7c60f681-40c7-4a18-82de-b81b3b6c7915
The tutorial will ask you to take various actions to interact with this code.
Some of the most popular contract classes on blockchains today are fungible tokens. These contracts create homogeneous tokens that can be transferred to other users and spent as currency (e.g., ERC-20 on Ethereum).
Usually, a central ledger keeps track of a user's token balances. With Cadence, we use a new resource paradigm to implement fungible tokens and avoid using a central ledger.
Flow Network Token
In Flow, the native network token will be implemented as a normal fungible token smart contract using a smart contract similar to the one in this tutorial. There will be special contracts and hooks that allow it be used for transaction execution payments and staking, but besides that, developers and users will be able to treat it and use it just like any other token in the network!
We're going to take you through these steps to get comfortable with the fungible token:
- Deploy the fungible token contract to account
0x01 - Create a fungible token object and store it in your account storage.
- Create a reference to your tokens that others can use to send you tokens.
- Set up another account the same way.
- Transfer tokens from one account to another.
- Use a script to read the accounts' balances.
Before proceeding with this tutorial, we recommend following the instructions in Getting Started and Hello, World! to learn the basics of the language and the playground.
Fungible Tokens on the Flow Emulator
Open the account 0x01 tab to see the file named
ExampleToken.cdc. ExampleToken.cdc should contain the full code for the
fungible token, which provides the core functionality to store fungible tokens
in your account and transfer to and accept tokens from other users.
The concepts involved in implementing a fungible token in Cadence can be hard to grasp at first. For an in-depth explanation of this functionality and code, continue reading the next section.
Or, if you'd like to go immediately into deploying it and using it in the playground, you can skip to the Interacting with the Fungible Token section of this tutorial.
Fungible Tokens: An In-Depth Exploration
How Flow implements fungible tokens is different from other programming languages. As a result:
- Ownership is decentralized and does not rely on a central ledger
- Bugs and exploits present less risk for users and less opportunity for attackers
- There is no risk of integer underflow or overflow
- Assets cannot be duplicated, and it is very hard for them to be lost, stolen, or destroyed
- Code can be composable
- Rules can be immutable
- Code is not unintentionally made public
Decentralizing Ownership
Instead of using a central ledger system, Flow ties ownership to each account via a new paradigm for asset ownership. The example below showcases how Solidity implements fungible tokens, with only the code for storage and transferring tokens shown for brevity.
contract ERC20 {
    mapping (address => uint256) private _balances;

    function _transfer(address sender, address recipient, uint256 amount) {
        // ensure the sender has a valid balance
        require(_balances[sender] >= amount);

        // subtract the amount from the senders ledger balance
        _balances[sender] = _balances[sender] - amount;

        // add the amount to the recipient’s ledger balance
        _balances[recipient] = _balances[recipient] + amount
    }
}
As you can see, Solidity uses a central ledger system for its fungible tokens. There is one contract that manages the state of the tokens and every time that a user wants to do anything with their tokens, they have to interact with the central ERC20 contract, calling its functions to update their balance. This contract handles access control for all functionality, implements all of its own correctness checks, and enforces rules for all of its users.
Instead of using a central ledger system, Flow utilizes a few different concepts to provide better safety, security, and clarity for smart contract developers and users. In this section, we'll show how Flow's resources, interfaces, and other features are employed via a fungible token example.
Intuiting Ownership with Resources
An important concept in Cadence is Resources, which are linear types.
A resource is a composite type that has its own defined fields and functions, similar to a struct.
The difference is that resource objects have special rules that keep them from being copied or lost.
Resources are a new paradigm for asset ownership. Instead of representing token ownership in a central ledger smart contract,
each account owns a resource object in their account storage that records the number of tokens they own.
This way, when users want to transact with each other, they can do so peer-to-peer without having to interact with a central token contract.
To transfer tokens to each other, they call a transfer function (or something equivalent) on their own resource object and other users' resources, instead of a central transfer function.
This approach simplifies access control because instead of a central contract having to check the sender of a function call, most function calls happen on resource objects stored in users' account, and each user controls who is able to call the functions on resources in their account. This concept, called Capability-based security, will be explained more in a later section.
This approach also helps protect against potential bugs. In a Solidity contract with all the logic contained in a central contract, an exploit is likely to affect all users who are involved in the contract. In Cadence, if there is a bug in the resource logic, an attacker would have to exploit the bug in each token holder's account individually, which is much more complicated and time-consuming than it is in a central ledger system.
Below is an example of a resource for a fungible token vault. Every user who owns these tokens would have this resource stored in their account.
It is important to remember that each account stores only a copy of the Vault resource, and not a copy of the entire ExampleToken contract.
The ExampleToken contract only needs to be stored in the initial account that manages the token definitions.
pub resource Vault: Provider, Receiver {

    // Balance of a user's Vault
    // we use unsigned integers for balances because they do not require the
    // concept of a negative number
    pub var balance: UFix64

    init(balance: UFix64) {
        self.balance = balance
    }

    pub fun withdraw(amount: UFix64): @Vault {
        self.balance = self.balance - amount
        return <-create Vault(balance: amount)
    }

    pub fun deposit(from: @Vault) {
        self.balance = self.balance + from.balance
        destroy from
    }
}
This piece of code is for educational purposes and is not comprehensive. However, it still showcases how a resource for a token works.
Each token resource object has a balance and associated functions (e.g., deposit, withdraw, etc).
When a user wants to use these tokens, they instantiate a zero-balance copy of this resource in their account storage.
The language requires that the initialization function init, which is only run once, must initialize all member variables.
// Balance of a user's Vault
// we use unsigned fixed-point integers for balances because they do not require the
// concept of a negative number and allow for more clear precision
pub var balance: UFix64

init(balance: UFix64) {
    self.balance = balance
}
Then, the deposit function can be available for any account to transfer tokens to.
pub fun deposit(from: @Vault) {
    self.balance = self.balance + from.balance
    destroy from
}
When an account wants to send tokens to a different account, the sending account calls their own withdraw function first, which subtracts tokens from their resource’s balance and temporarily creates a new resource object that holds this balance. The sending account then calls the recipient account’s deposit function, which literally moves the resource instance to the other account, adds it to their balance, and then destroys the used resource. The resource needs to be destroyed because Cadence enforces strict rules around resource interactions. A resource can never be left hanging in a piece of code. It either needs to be explicitly destroyed or stored in an account's storage.
When interacting with resources, you use the @ symbol and a special “move operator” <-.
pub fun withdraw(amount: UInt64): @Vault {
This @ symbol is required when specifying a resource type for a field, an argument, or a return value.
The move operator <- makes it clear that when a resource is used in an assignment, parameter, or return value,
it is moved to a new location and the old location is invalidated. This ensures that the resource only ever exists in one location at a time.
If a resource is moved out of an account's storage, it either needs to be moved to an account’s storage or explicitly destroyed.
destroy from
This rule ensures that resources, which often represent real value, do not get lost because of a coding error.
You’ll notice that the arithmetic operations aren't explicitly protected against overflow or underflow.
self.balance = self.balance - amount
In Solidity, this could be a risk for integer overflow or underflow, but Cadence has built-in overflow and underflow protection, so it is not a risk. We are also using unsigned integers in this example, so the vault`s balance cannot go below 0.
Additionally, the requirement that an account contains a copy of the token’s resource type in its storage ensures that funds cannot be lost by being sent to the wrong address. If an address doesn’t have the correct resource type imported, the transaction will revert, ensuring that transactions sent to the wrong address are not lost.
The line in withdraw that creates a new Vault has the parameter name balance specified in the function call.
return <-create Vault(balance: amount)
This is another feature that Cadence has to improve the clarity of code. All function calls are required to specify the names of the arguments they are sending unless the developer has specifically overridden the requirement in the funtion declaration.
Ensuring Security in Public: Capability Security
Another important feature in Cadence is its utilization of Capability Security. This feature ensures that, while the withdraw function is public, no one except the intended user and those they approve of can withdraw tokens from their vault.
Cadence's security model ensures that objects stored in an account's storage can only be accessed by the account that owns them. If a user wants to give another user access to their stored objects, they can link a public capability, which is like an "API" that allows others to call specified functions on their objects.
An account only has access to the fields and methods of an object in a different account if they own a capability to that object that explicitly allows them to access those fields and methods. Only the owner of an object can create a reference for it. Therefore, when a user creates a Vault in their account, they only publish references to the deposit function and the balance. The withdraw function can remain hidden as a function that only the owner can call.
As you can hopefully see, this removes the need to check msg.sender for access control purposes,
because this functionality is handled by the protocol and type checker.
If you aren't the owner of an object or don't have a valid reference to it that was created by the owner, you cannot access the object at all!
Using Interfaces to Secure Implementations
The next important concept in Cadence is design-by-contract, which uses preconditions and postconditions to document and programmatically assert the change in state caused by a piece of a program. These conditions are specified in interfaces that enforce rules about how types are defined and behave. They can be stored on-chain in an immutable fashion so that certain pieces of code can import and implement them to ensure that they meet certain standards.
Here is an example of how interfaces for the Vault resource we defined above would look.
// Interface that enforces the requirements for withdrawing
// tokens from the implementing type
//
pub resource interface Provider {
    pub fun withdraw(amount: UFix64): @Vault {
        post {
            result.balance == amount:
                "Withdrawal amount must be the same as the balance of the withdrawn Vault"
        }
    }
}
// Interface that enforces the requirements for depositing
// tokens into the implementing type
//
pub resource interface Receiver {

    // There aren't any meaningful requirements for only a deposit function
    // but this still shows that the deposit function is required in an implementation.
    pub fun deposit(from: @Vault)
}
In our example, the Vault resource would implement both of these interfaces.
The interfaces ensure that specific fields and functions are present in the resource implementation
and that those functions meet certain conditions before and/or after execution.
These interfaces can be stored on-chain and imported into other contracts or resources
so that these requirements are enforced by an immutable source of truth that is not susceptible to human error.
You can also see that functions and fields have the pub keyword next to them.
We have explicitly defined these fields as public because all fields and functions in Cadence are private by default,
meaning that the local scope can only access them. Users have to make parts of their owned types explicitly public.
This helps prevent types from having unintentionally public code.
Interacting with the Fungible Token in the Flow Playground
Now that you have read about how the Fungible Token works, we can deploy it to your account and send some transactions to interact with it.
Make sure that you have opened the Fungible Token templates in the playground
by following the link at the top of this page. You should have Account 0x01
open and should see the code below.
pub contract ExampleToken {

    // Total supply of all tokens in existence.
    pub var totalSupply: UFix64

    // Provider
    //
    // Interface that enforces the requirements for withdrawing
    // tokens from the implementing type.
    //
    // We don't enforce requirements on self.balance here because
    // it leaves open the possibility of creating custom providers
    // that don't necessarily need their own balance.
    //
    pub resource interface Provider {

        // withdraw
        //
        // Function that subtracts tokens from the owner's Vault
        // and returns a Vault resource (@Vault) with the removed tokens.
        //
        // The function's access level is public, but this isn't a problem
        // because even the public functions are not fully public at first.
        // anyone in the network can call them, but only if the owner grants
        // them access by publishing a resource that exposes the withdraw
        // function.
        //
        pub fun withdraw(amount: UFix64): @Vault {
            post {
                // `result` refers to the return value of the function
                result.balance == UFix64(amount):
                    "Withdrawal amount must be the same as the balance of the withdrawn Vault"
            }
        }
    }

    // Receiver
    //
    // Interface that enforces the requirements for depositing
    // tokens into the implementing type.
    //
    // We don't include a condition that checks the balance because
    // we want to give users the ability to make custom Receivers that
    // can do custom things with the tokens, like split them up and
    // send them to different places.
    //
    pub resource interface Receiver {
        // deposit
        //
        // Function that can be called to deposit tokens
        // into the implementing resource type
        //
        pub fun deposit(from: @Vault)
    }

    // Balance
    //
    // Interface that specifies a public `balance` field for the vault
    //
    pub resource interface Balance {
        pub var balance: UFix64
    }

    // Vault
    //
    // Each user stores an instance of only the Vault in their storage
    // The functions in the Vault and governed by the pre and post conditions
    // in the interfaces when they are called.
    // The checks happen at runtime whenever a function is called.
    //
    // Resources can only be created in the context of the contract that they
    // are defined in, so there is no way for a malicious user to create Vaults
    // out of thin air. A special Minter resource needs to be defined to mint
    // new tokens.
    //
    pub resource Vault: Provider, Receiver, Balance {

        // keeps track of the total balance of the account's tokens
        pub var balance: UFix64

        // initialize the balance at resource creation time
        init(balance: UFix64) {
            self.balance = balance
        }

        // withdraw
        //
        // Function that takes an integer amount as an argument
        // and withdraws that amount from the Vault.
        //
        // It creates a new temporary Vault that is used to hold
        // the money that is being transferred. It returns the newly
        // created Vault to the context that called so it can be deposited
        // elsewhere.
        //
        pub fun withdraw(amount: UFix64): @Vault {
            self.balance = self.balance - amount
            return <-create Vault(balance: amount)
        }

        // deposit
        //
        // Function that takes a Vault object as an argument and adds
        // its balance to the balance of the owners Vault.
        //
        // It is allowed to destroy the sent Vault because the Vault
        // was a temporary holder of the tokens. The Vault's balance has
        // been consumed and therefore can be destroyed.
        pub fun deposit(from: @Vault) {
            self.balance = self.balance + from.balance
            destroy from
        }
    }

    // createEmptyVault
    //
    // Function that creates a new Vault with a balance of zero
    // and returns it to the calling context. A user must call this function
    // and store the returned Vault in their storage in order to allow their
    // account to be able to receive deposits of this token type.
    //
    pub fun createEmptyVault(): @Vault {
        return <-create Vault(balance: UFix64(0))
    }

    // VaultMinter
    //
    // Resource object that an admin can control to mint new tokens
    pub resource VaultMinter {

        // Function that mints new tokens and deposits into an account's vault
        // using their `Receiver` reference.
        // We say `&AnyResource{Receiver}` to say that the recipient can be any resource
        // as long as it implements the Receiver interface
        pub fun mintTokens(amount: UFix64, recipient: &AnyResource{Receiver}) {
            ExampleToken.totalSupply = ExampleToken.totalSupply + UFix64(amount)
            recipient.deposit(from: <-create Vault(balance: amount))
        }
    }

    // The init function for the contract. All fields in the contract must
    // be initialized at deployment. This is just an example of what
    // an implementation could do in the init function. The numbers are arbitrary.
    init() {
        self.totalSupply = UFix64(30)

        // create the Vault with the initial balance and put it in storage
        // account.save saves an object to the specified `to` path
        // The path is a literal path that consists of a domain and identifier
        // The domain must be `storage`, `private`, or `public`
        // the identifier can be any name
        self.account.save(<-create Vault(balance: UFix64(30)), to: /storage/MainVault)

        // Create a new VaultMinter resource and store it in account storage
        self.account.save(<-create VaultMinter(), to: /storage/MainMinter)
    }
}
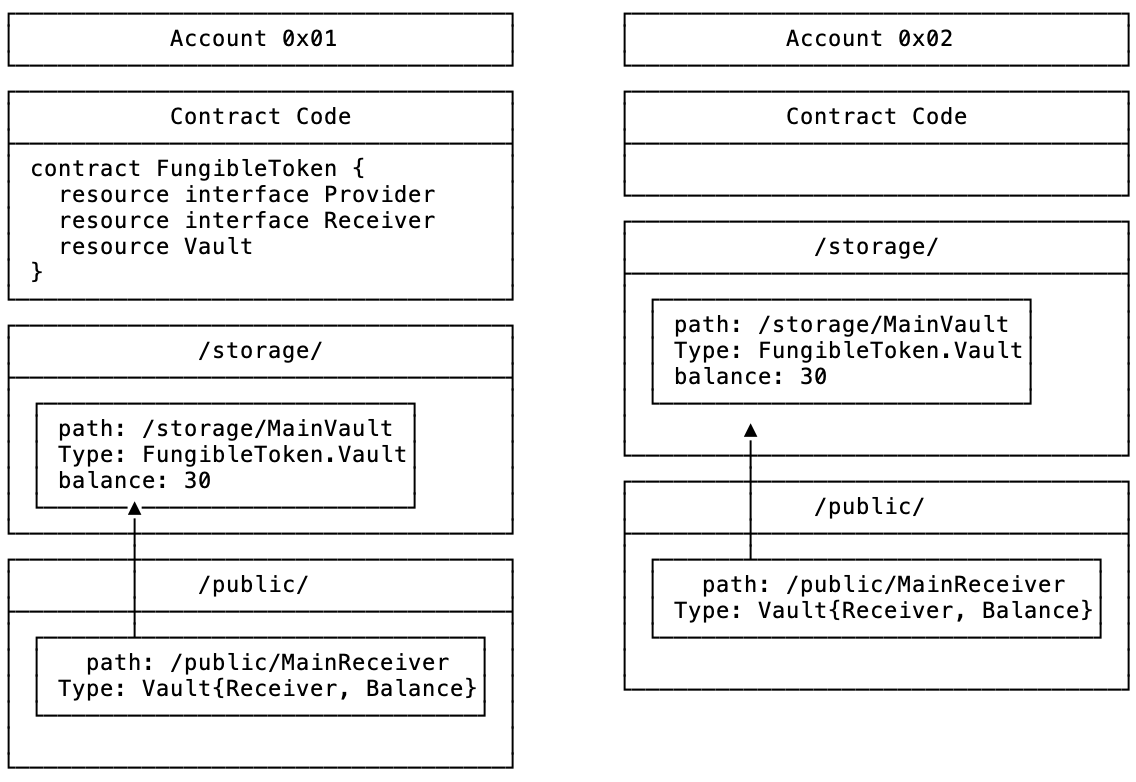
Click the Deploy button at the bottom right of the editor to deploy the code.
This deployment stores the contract for the fungible token in your active account (account 0x01) so that it can be imported into transactions.
A contract's init function runs at contract creation, and never again afterwards.
In our example, this function stores an instance of the Vault object with an initial balance of 30, and stores the VaultMinter object that you can use to mint new tokens.
// create the Vault with the initial balance and put it in storage
// account.save saves an object to the specified `to` path
// The path is a literal path that consists of a domain and identifier
// The domain must be `storage`, `private`, or `public`
// the identifier can be any name
self.account.save(<-create Vault(balance: UFix64(30)), to: /storage/MainVault)
This line saves the new @Vault object to storage.
Account storage is indexed with paths, which consist of a domain and identifier. /domain/identifier. Only three domains are allowed for paths:
storage: The place where all objects are stored. Only accessible by the owner of the account.private: Stores links, otherwise known as capabilities, to objects in storage. Only accessible by the owner of the accountpublic: Stores links to objects in storage: Accessible by anyone in the network.
Contracts have access to the private AuthAccount object of the account it is deployed to, using self.account.
This object has methods that can modify storage in many ways. See the account documentation for a list of all the methods it can call.
In this line, we call the save method to store an object in storage.
The first argument is the value to store, and the second argument is the path where the value is being stored.
For save the path has to be in the /storage domain.
We also store the VaultMinter object to /storage/ in the next line in the same way:
self.account.save(<-create VaultMinter(), to: /storage/MainMinter)
You should also see that the ExampleToken.Vault and ExampleToken.VaultMinter resource objects are stored in the account storage.
This will be shown in the Resources box at the bottom of the screen.
You are now ready to run transactions that use the fungible tokens!
Create, Store, and Publish Capabilities and References to a Vault
Capabilities are like pointers in other languages. They are a link to an object in an account's storage and can be used to read fields or call functions on the object they reference. They cannot move or modify the object directly.
There are many different situations in which you would create a capability to your fungible token vault.
You might want a simple way to call methods on your Vault from anywhere in a transaction.
You could also send a capability that only exposes withdraw function in your Vault so that others can transfer tokens for you.
You could also have one that only exposes the Balance interface, so that others can check how many tokens you own.
There could also be a function that takes a capability to a Vault as an argument, borrows a reference to the capability,
makes a single function call on the reference, then finishes and destroys the reference.
We already use this pattern in the Vault resource in the mintTokens function, shown here:
// Function that mints new tokens and deposits into an account's vault
// using their `Receiver` capability.
// We say `&AnyResource{Receiver}` to say that the recipient can be any resource
// as long as it implements the Receiver interface
pub fun mintTokens(amount: UFix64, recipient: Capability<&AnyResource{Receiver}>) {
    let recipientRef = recipient.borrow()
        ?? panic("Could not borrow a receiver reference to the vault")

    ExampleToken.totalSupply = ExampleToken.totalSupply + UFix64(amount)
    recipientRef.deposit(from: <-create Vault(balance: amount))
}
The function takes a capability to any resource that implements the Receiver interface, borrows a reference from it,
and uses the reference to call the deposit function of that resource.
Let's create capabilities to your Vault so that a separate account can send tokens to you.
Open the transaction named Create Link.
Create Link should contain the following code for creating a reference to the stored Vault:
import ExampleToken from 0x01

// This transaction creates a capability
// that is linked to the account's token vault.
// The capability is restricted to the fields in the `Receiver` interface,
// so it can only be used to deposit funds into the account.
transaction {
  prepare(acct: AuthAccount) {

    // Create a link to the Vault in storage that is restricted to the
    // fields and functions in `Receiver` and `Balance` interfaces,
    // this only exposes the balance field
    // and deposit function of the underlying vault.
    //
    acct.link<&ExampleToken.Vault{ExampleToken.Receiver, ExampleToken.Balance}>(/public/MainReceiver, target: /storage/MainVault)

    log("Public Receiver reference created!")
  }

  post {
    // Check that the capabilities were created correctly
    // by getting the public capability and checking
    // that it points to a valid `Vault` object
    // that implements the `Receiver` interface
    getAccount(0x01).getCapability<&ExampleToken.Vault{ExampleToken.Receiver}>(/public/MainReceiver)
                    .check():
                    "Vault Receiver Reference was not created correctly"
    }
}
In order to use a capability, we have to first create a link to that object in storage. A reference can then be created from a capability, and references cannot be stored. They need to be lost at the end of a transaction execution. This restriction is to prevent reentrancy attacks which are attacks where a malicious user calls into the same function over and over again before the original execution has finished. Only allowing one reference at a time for an object prevents these attacks for objects in storage.
To create a capability, we use the link function.
// Create a link to the Vault in storage that is restricted to the
// fields and functions in `Receiver` and `Balance` interfaces,
// this only exposes the balance field
// and deposit function of the underlying vault.
//
acct.link<&ExampleToken.Vault{ExampleToken.Receiver, ExampleToken.Balance}>.
(/public/MainReceiver, target: /storage/MainVault)
link creates a new capability that is kept at the path in the first argument, targeting the target in the second argument.
The type restriction for the link is specified in the <>. We use &ExampleToken.Vault{ExampleToken.Receiver, ExampleToken.Balance}
to say that the link can be any resource as long as it implements and is cast as the Receiver interface.
This is the common format for describing references.
You first have a & followed by the concrete type, then the interface in curly braces to ensure that
it is a reference that implements that interface and only includes the fields specified in that interface.
We put the capability in /public/MainReceiver because we want it to be publicly accessible.
The public domain of an account is accessible to anyone in the network via an account's PublicAccount object, which is fetched by using the getAccount(address) function.
Next is the post phase of the transaction.
post {
// Check that the capabilities were created correctly
// by getting the public capability and checking
// that it points to a valid `Vault` object
// that implements the `Receiver` interface
getAccount(0x01).getCapability(/public/MainReceiver)
                .check<&ExampleToken.Vault{ExampleToken.Receiver}>():
                "Vault Receiver Reference was not created correctly"
}
The post phase is for ensuring that certain conditions are met after the transaction has been executed.
Here, we are getting the capability from its public path and calling its check function to ensure
that the capability contains a valid link to a valid object in storage that is the specified type.
Select account 0x01 as the only signer.
Click the Send button to submit the transaction.
This transaction creates a new public reference to your Vault and checks that it was created correctly.
Transfer Tokens to Another User
Now, we are going to run a transaction that sends 10 tokens to account 0x02. We will do this by calling the withdraw function on account 0x01's Vault,
which creates a temporary Vault object for moving the tokens, then deposits those tokens into account 0x02's account by calling their deposit function.
Here we encounter another safety feature that Cadence introduces. Owning tokens requires you to have a Vault object stored in your account,
so if anyone tries to send tokens to an account who isn't prepared to receive them, the transaction will fail.
This way, Cadence protects the user if they accidentally enter the account address incorrectly when sending tokens.
Account 0x02 has not been set up to receive tokens, so we will do that now:
Open the transaction Setup Account.
Select account 0x02 as the only signer.
Click the Send button to set up account 0x02 so that it can receive tokens.
import ExampleToken from 0x01

// This transaction configures an account to store and receive tokens defined by
// the ExampleToken contract.
transaction {
  prepare(acct: AuthAccount) {
    // Create a new empty Vault object
    let vaultA <- ExampleToken.createEmptyVault()

    // Store the vault in the account storage
    acct.save<@ExampleToken.Vault>(<-vaultA, to: /storage/MainVault)

    log("Empty Vault stored")

    // Create a public Receiver capability to the Vault
    let ReceiverRef = acct.link<&ExampleToken.Vault{ExampleToken.Receiver, ExampleToken.Balance}>(/public/MainReceiver, target: /storage/MainVault)

    log("References created")
  }

  post {
    // Check that the capabilities were created correctly
    getAccount(0x02).getCapability(/public/MainReceiver)
                    .check<&ExampleToken.Vault{ExampleToken.Receiver}>():
                    "Vault Receiver Reference was not created correctly"
  }
}
Here we perform the same actions that account 0x01 did to set up its Vault, but all in one transaction.
Account 0x02 is ready to start building its fortune! As you can see, when we created the Vault for account 0x02,
we had to create one with a balance of zero by calling the createEmptyVault() function.
Resource creation is restricted to the contract where it is defined, so in this way, the Fungible Token smart contract can ensure that
nobody is able to create new tokens out of thin air.
As part of the initial deployment process for the ExampleToken contract, account 0x01 created a VaultMinter object.
By using this object, the account that owns it can mint new tokens. Right now, account 0x01 owns it, so it has sole power to mint new tokens.
We could have had a mintTokens function defined in the contract, but then we would have to check the sender of the function call to make sure that they are authorized,
which is not the recommended way to perform access control.
As we explained before, the resource model plus capability security handles this access control for us as a built in language construct
instead of having to be defined in the code. If account 0x01 wanted to authorize another account to mint tokens,
they could either move the VaultMinter object to the other account, or give the other account a private capability to the single VaultMinter.
Or, if they didn't want minting to be possible after deployment, they would simply mint all the tokens at contract initialization
and not even include the VaultMinter in the contract.
In the next transaction, account 0x01 will mint 30 new tokens and deposit them into account 0x02's newly created Vault.
Select only account 0x01 as a signer and send Mint Tokens to mint 30 tokens for account 0x02.
Mint Tokens should contain the code below.
import ExampleToken from 0x01

// This transaction mints tokens and deposits them into account 2's vault
transaction {

  // Local variable for storing the reference to the minter resource
  let mintingRef: &ExampleToken.VaultMinter

  // Local variable for storing the reference to the Vault of
  // the account that will receive the newly minted tokens
  var receiverRef: Capability<&ExampleToken.Vault{ExampleToken.Receiver}>

  prepare(acct: AuthAccount) {
    // Borrow a reference to the stored, private minter resource
    self.mintingRef = acct.borrow<&ExampleToken.VaultMinter>(from: /storage/MainMinter)
        ?? panic("Could not borrow a reference to the minter")

    // Get the public account object for account 0x02
    let recipient = getAccount(0x02)

    // Get the public receiver capability
    let cap = recipient.getCapability(/public/MainReceiver)

    // Borrow a reference from the capability
    self.receiverRef = cap.borrow<&ExampleToken.Vault{ExampleToken.Receiver}>()
        ?? panic("Could not borrow a reference to the receiver")
}

  execute {
      // Mint 30 tokens and deposit them into the recipient's Vault
      self.mintingRef.mintTokens(amount: UFix64(30), recipient: self.receiverRef)

      log("30 tokens minted and deposited to account 0x02")
  }
}
This is the first example of a transaction where we utilize local transaction variables that span different stages in the transaction.
We declare the mintingRef and receiverRef variables outside of the prepare stage but must initialize them in prepare.
We can then use them in later stages in the transaction.
In addition to borrowing references from capabilities, you'll see in this transaction that you can also borrow a reference directly from an object in storage.
// Borrow a reference to the stored, private minter resource
self.mintingRef = acct.borrow<&ExampleToken.VaultMinter>(from: /storage/MainMinter)
    ?? panic("Could not borrow a reference to the minter")
Here, we specify the borrow as a VaultMinter reference and have the reference point to /storage/MainMinter.
The reference is borrowed as an optional so we use the nil-coalescing operator (??) to make sure the value isn't nil.
If the value is nil, the transaction will execute the code after the ??. The code is a panic, so it will revert and print the error message.
You can use the getAccount() built-in function to get any account's public account object.
The public account object lets you get capabilities from the public domain of an account, where public capabilities are stored.
We use the getCapability function to get the public capability from a public path,
then use the borrow function on the capability to get the reference from it, typed as a ExampleToken.Vault{ExampleToken.Receiver}.
// Get the public receiver capability
let cap = recipient.getCapability(/public/MainReceiver)

// Borrow a reference from the capability
self.receiverRef = cap.borrow<&ExampleToken.Vault{ExampleToken.Receiver}>()
        ?? panic("Could not borrow a reference to the receiver")
In the execute phase, we simply use the reference to mint 30 tokens and deposit them into the Vault of account 0x02.
Check Account Balances
Now, both account 0x01 and account 0x02 should have a Vault object in their storage that has a balance of 30 tokens.
They both should also have a Receiver capability stored in their /public/ domains that links to their stored Vault.
An account cannot receive any token type unless it is specifically configured to accept those tokens.
As a result, it is difficult to send tokens to the wrong address accidentally.
But, if you make a mistake setting up the Vault in the new account, you won't be able to send tokens to it.
Let's run a script to make sure we have our vaults set up correctly.
You can use scripts to access an account's public state. Scripts aren't signed by any account and cannot modify state.
In this example, we will query the balance of each account's vault. The following will print out the balance of each account in the emulator.
Open the script named Script1.cdc in the scripts pane.
Script1.cdc should contain the following code:
import ExampleToken from 0x01

// This script reads the Vault balances of two accounts.
pub fun main() {
    // Get the accounts' public account objects
    let acct1 = getAccount(0x01)
    let acct2 = getAccount(0x02)

    // Get references to the account's receivers
    // by getting their public capability
    // and borrowing a reference from the capability
    let acct1ReceiverRef = acct1.getCapability<&ExampleToken.Vault{ExampleToken.Balance}>(/public/MainReceiver)
        .borrow()
        ?? panic("Could not borrow a reference to the acct1 receiver")

    let acct2ReceiverRef = acct2.getCapability<&ExampleToken.Vault{ExampleToken.Balance}>(/public/MainReceiver)
        .borrow()
        ?? panic("Could not borrow a reference to the acct2 receiver")

    // Read and log balance fields
    log("Account 1 Balance")
    log(acct1ReceiverRef.balance)
    log("Account 2 Balance")
    log(acct2ReceiverRef.balance)
}
Execute Script1.cdc by clicking the Execute button.
This should ensure the following:
- Account
0x01's balance is 30 - Account
0x02's balance is 30
If correct, you should see the following lines:
"Account 1 Balance"
30
"Account 2 Balance"
30
Result > "void"
If there is an error, this probably means that you missed a step earlier and might need to restart from the beginning.
To restart the playground, close your current session and open the link at the top of the tutorial.
Now that we have two accounts, each with a Vault, we can see how they transfer tokens to each other!
Open the transaction named Transfer Tokens.
Select account 0x02 as a signer and send the transaction.
Transfer Tokens should contain the following code for sending tokens to another user:
import ExampleToken from 0x01

// This transaction is a template for a transaction that
// could be used by anyone to send tokens to another account
// that owns a Vault
transaction {

  // Temporary Vault object that holds the balance that is being transferred
  var temporaryVault: @ExampleToken.Vault

  prepare(acct: AuthAccount) {
    // withdraw tokens from your vault by borrowing a reference to it
    // and calling the withdraw function with that reference
    let vaultRef = acct.borrow<&ExampleToken.Vault>(from: /storage/MainVault)
        ?? panic("Could not borrow a reference to the owner's vault")

    self.temporaryVault <- vaultRef.withdraw(amount: UFix64(10))
  }

  execute {
    // get the recipient's public account object
    let recipient = getAccount(0x01)

    // get the recipient's Receiver reference to their Vault
    // by borrowing the reference from the public capability
    let receiverRef = recipient.getCapability(/public/MainReceiver)
                      .borrow<&ExampleToken.Vault{ExampleToken.Receiver}>()
                      ?? panic("Could not borrow a reference to the receiver")

    // deposit your tokens to their Vault
    receiverRef.deposit(from: <-self.temporaryVault)

    log("Transfer succeeded!")
  }
}
In this example, the signer withdraws tokens from their Vault, which creates and returns a temporary Vault resource object with balance=10
that is used for transferring the tokens. In the execute phase. the transaction moves that resource to another user's Vault using their deposit method.
The temporary Vault is destroyed after its balance is added to the recipient's Vault.
You might be wondering why we have to use two function calls to complete a token transfer when it is possible to do it in one.
This is because of the way resources work in Cadence. In a ledger-based model, you would just call transfer, which just updates the ledger,
but in Cadence, the location of the tokens matters, and therefore most token transfer situations will not just be a direct account-to-account transfer.
Most of the time, tokens will be used for a different purpose first,
like purchasing something, and that requires the Vault to be separately sent and verified before being deposited to the storage of an account.
Separating the two also allows us to take advantage of being able to statically verify which parts of accounts can be modified in the prepare section of a transaction,
which will help users have peace of mind when getting fed transactions to sign from an app.
Execute Script1.cdc again.
If correct, you should see the following lines indicating that account 0x01's balance is 40 and account 0x02's balance is 20:
"Account 1 Balance"
40
"Account 2 Balance"
20
Result > "void"
You now know how a basic fungible token is used in Cadence and Flow!
From here, you could try to extend the functionality of fungible tokens by making:
- A faucet for these tokens
- An escrow that can be deposited to (but only withdrawn when the balance reaches a certain point)
- A function to the resource that mints new tokens!
Non-Fungible Tokens on Flow
Now that you have an understanding of how fungible tokens work on Flow, you're ready to play with non-fungible tokens!